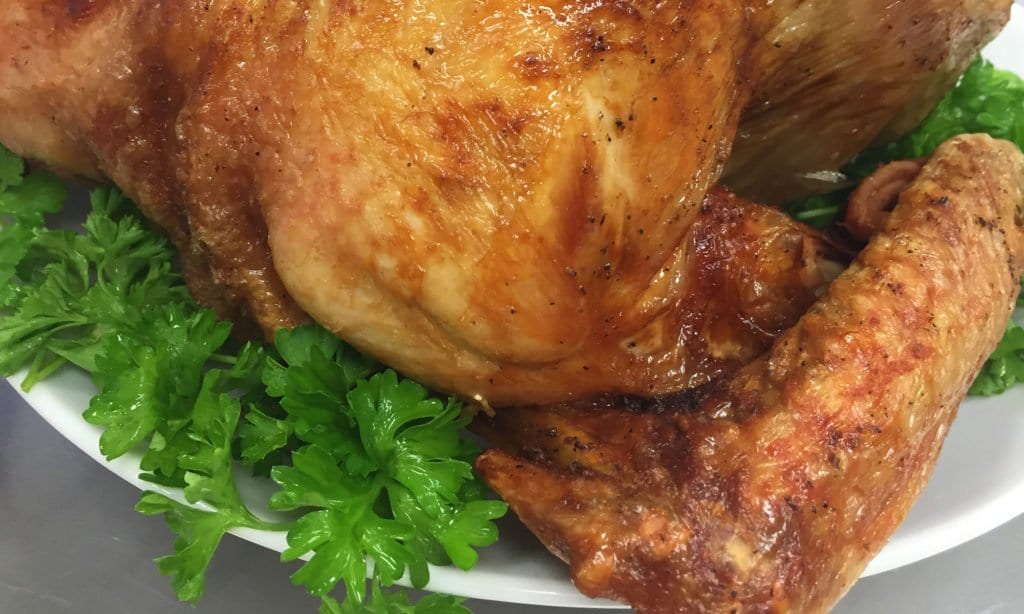
What the Turducken!

Turducken

Holidays are a time for tradition. We decided it was start a new one. We cooked the infamous turducken. In case you aren’t familiar, that’s a portmanteau word that describes the recipe which combines turkey, duck, and chicken all rolled into one. Sound too good to be true? Honestly, we thought so too!

This isn’t a task to take on unless you are fully committed to the challenge. Patience is your friend while preparing the turducken.

Process

Debone the birds– turkey, chicken, and duck. We did this the day before to save time. Depending on your expertise, this can take from 45 to 90 minutes.

turducken birds still have their bones
turducken birds sans bones
Chopped Vegetables

Stuffing is placed between each meat layer. Feel free to put your own spin on the stuffing. We also made a double batch for each turkey to ensure we had enough for each layer.

  • Stuffing mix of your choice (we used corn bread)
  • Celery
  • Onion
  • Chicken broth (or vegetable broth)
  • Fresh parsley
  • Fresh sage
  • Minced garlic
  • Paprika
  • Pepper
  • Salt

Now for the Turducken!

  • Season each piece of meat with salt and pepper.
  • Lay turkey out flat so it’s ready for the stuffing.
  • Pat the first layer of stuffing on the turkey.
layering stuffing into the turducken
  • Place chicken thighs on top half of turkey, and chicken breasts on the lower half.
adding another layer to the turducken
  • Pat a second layer of stuffing on top of the turkey-chicken combo.
Minced Meat
  • Place the duck in the middle of the stuffing layer.
  • Add the last layer of stuffing.
folding up the turducken
folding up the turducken more
stitching the turducken
skewering the turducken
sealed turducken
  • Begin pulling up sides of turkey to secure everything inside with twine or skewers.
  • Season outside of turkey – we used paprika, salt, and pepper.
seasoned turduckens

Settings

We doubled up and made two turduckens. One was cooked using a CVap® Cook and Hold Oven.  The other was staged in the CVap oven and then fried in a Collectramatic®  Pressure Fryer.

The roasted turducken was cooked on high yield at 170°F doneness and 4 level browning (new CVap 170°F Vapor Temp/200°F Air Temp) for six hours, then held overnight for eight hours at 150°F doneness and 1 level browning (new CVap 150°F Vapor Temp/155°F Air Temp).

The staged and fried turducken was staged at 165°F and 0 browning (new CVap 165°F Vapor and Air Temp) overnight for 14 hours and then finished in the fryer for three minutes.

Roasted Turducken –82% yield

roasted turducken
roasted turducken interior

Staged & Fried Turducken– 84% yield

fried turducken
fried turducken
fried turducken interior

Fried Chicken and Steamed Rice Held in CVap Stay So Nice!

Cvap Steaming rice

Uncle Jack Fried Chicken is a Malaysian restaurant chain. They use our Collectramatic pressure fryers. Ordinarily, they serve chicken from a display warmer. To maximize holding time, they limit the warmer to 35°C (95°F), putting a limit on the amount of time they could hold chicken before it was no longer fit to sell. We suggested they test our CVap holding cabinet, in the hopes of extending holding time and improving food quality. We tested fried chicken and steamed rice. The results were exciting!

Holding Cabinet Preparation

The CVap cabinet was set at food temperature 54°C (129°F) and food texture at + 28°C (82°F). We gave the cabinet 45 minutes to preheat.

Chicken
12:05pm: 

The chicken moved from the fryer to the holding cabinet (15 pieces). Chicken was crispy outside, moist inside. The meat was very hot to touch. The taste was really good.

Rice
12:10pm: 

Cooked rice (wrapped in oil paper) was put into the same holding cabinets with fried chicken. Initial rice quality was moist, sticky, and fragrant.

Fried Chicken
13:05pm: (holding 60 minutes)

The chicken was still crispy outside (though slightly less crisp than when first removed from fryer). Interior was still hot, and the color was unchanged. The chicken breading remained crisp.

UJ Fried Chicken
13:05pm: (holding 60 minutes)

Chicken was still crispy and moist. Color was good. Food retained flavor, with minimal freshness loss.

Fried Chicken
13:55pm (holding for 2 hours)

The skin remained crispy, though not as crisp as when initially fried. Flavor and moisture were still good. Color had not darkened.

Steamed Rice
14:00pm (rice held for 2 hours)

Rice was hot and tasted fresh. Not dried out at all.

Chicken Fried
15:35pm (3.5 hour holding time)

The chicken tasted good. Its skin remained crispy, and its meat, moist. Although it was not “just cooked” fresh after 3.5 hours, it was still at a safe temperature. It remained appetizing enough to serve.

Steamed Rice
15:40pm (after holding for 3.5 hours)

Rice was hot, and texture was good.

CVap Holding Cabinet Test Conclusions

Electricity Consumption: 800 watts

Holding Capacity per Cabinet: 13 full-size sheet pans, each rack equals one basket (4 heads) chicken or 338 pieces

Goals for Future Testing

  1. Extending the holding time for the chicken without compromising the texture, taste, and food safety.
  2. Testing other products, (wrapped rice was incorporated).
  3. Improving staff workflow.
  4. Staff can pre-prepare chicken during lean hours in preparation for peak hours, shortening the waiting time while producing the best-tasting fried chicken.
  5. During lean hours, customers can still savor the taste of freshly fried chicken.
  6. Minimize food shrinkage.
  7. Minimize food waste.
  8. Consequently, extension of holding times for other foods is possible since CVap cabinets are versatile enough to hold both crispy and moist foods. So holding fried chicken and steamed rice together was not a problem!

One Final Note – CVap Technology is Great, But It’s Not Magic.

The very nature of fried foods (crisp outside with moist interior) promotes evaporation. CVap technology is the best available to maximize holding time, but even CVap, using the necessary high differential setting (the difference of food texture setting over the food temperature setting) will eventually lose the battle to maintain food temp and freshness. It’ll hold fresh longer than the competitors, but if the food is crunchy (fried chicken, French fries, etc), it can only be held for so long.

On the other hand, moist foods, such as rice or noodles, are perfect for CVap and can be held for many hours with no loss of temperature or quality.

The consensus of the Uncle Jack test was that it was possible to lengthen the chicken’s holding time. More testing is needed to perfect the texture, taste, and crispiness.

Bringing the Heat with Nashville Hot Chicken

Nashville hot chicken

Winter may be waning, but the popularity of Nashville Hot Chicken sure isn’t. We decided to try our hand at preparing a big batch. It was as good (and hot!) as promised.

Nashville Hot Chicken’s History

Nashville Hot Chicken’s powerful poultry story originated nearly seven decades ago, at Prince’s Hot Chicken Shack. Apparently Thorton Prince was quite the lady’s man. Tiring of his late night escapades, his gal served him up a Sunday breakfast of fried chicken, generously doused in cayenne pepper and other fiery spices. Her revenge backfired – rather than crying out in pain, he loved it. Consequently the inspiration for Nashville Hot Chicken was born. If you’re interested, read the whole story on Prince’s website. Numerous other restaurants and chains, inspired by Prince’s, have put their own twist on this Nashville classic.

The Process

We brined the chicken in the fridge overnight using a simple 6% brine. Learn everything you need to know about brining on our friends’ site Genuine Ideas (browse under their food header).

We lightly dusted the chicken with seasoned flour. After that we dipped it in a simple blend of eggs, buttermilk and hot sauce.

Dipping

Subsequently, we tossed lightly again in breading mix, giving us a light double-breaded chicken. Double-breading creates a nice robust crunch once the chicken is fried.

Properly prepped, the chicken was ready for the Collectramatic® Fryer.

breaded hot chicken
nashville hot chicken fresh from the fryer

We fried the chicken for 15 minutes at 325°F. It emerged from the fryer a mouth-watering golden brown. After allowing excess oil to drip away, we painted the spicy special sauce on with a pastry brush.

The hot chicken was as good as we hoped, delivering a delicious heat that delighted our taste buds while making our faces flush and our brows sweat.

This chicken can be held for two hours in a CVap® Holding Cabinet. After frying, place it directly in a CVap set to 135 +50. Apply the sauce just before serving.

Here’s a pared-down version of the recipe (in case you’re not feeding an army).

Nashville Hot Chicken Recipe

  • 2 – 3 1/2-4-pound chickens, each cut into ten pieces (breasts halved)
  • 1 gallon of 6% brine
  • 4 large eggs
  • 2 cups buttermilk or whole milk
  • 2 tablespoons vinegar-based hot sauce (such as Tabasco or Texas Pete)
  • 4 cups all-purpose flour seasoned with salt, pepper and paprika. (You may use your own special flour mix if you’d like).
  • Vegetable oil (for frying; about 10 cups) (unless, of course, you have a Collectramatic fryer handy).
  • 6 tablespoons cayenne pepper
  • 2 tablespoons dark brown sugar
  • 1 teaspoon chili powder
  • 1 teaspoon garlic powder
  • 1 teaspoon paprika
Chicken Done Cut

The Process

  1. Whisk eggs, buttermilk, and hot sauce in a large bowl. Subsequently, whisk flour and remaining four teaspoons salt in another large bowl.
  2. If you’re not using a Collectramatic fryer, fit a Dutch oven with frying thermometer. After that pour in oil to about two inches depth. Heat over medium-high heat until thermometer registers 325°F.
  3. Pat chicken dry. Working with one piece at a time, dredge in flour mixture, shaking off excess, and then dip in buttermilk mixture, letting excess drip back into bowl.
  4. Subsequently dredge again in flour mixture and place on a baking sheet.
  5. Working in four batches and returning oil to 325°F between batches, fry chicken, turning once after 15 minutes until skin is deep golden brown and crisp. Check with an instant-read thermometer inserted into thigh pieces to verify that the inner temp registers at least 185°F (165°F for white meat). This usually takes ten more minutes after the turn, for a total cook time of 25 minutes.
  6. Transfer to a clean wire rack set inside a baking sheet.
  7. After that, remove oil from heat and let it cool slightly.
  8. Whisk cayenne, brown sugar, chili powder, garlic powder, and paprika in a medium bowl.
  9. Carefully whisk in 1 cup hot frying oil or melted lard.
  10. Just before serving, brush fried chicken with spicy oil. Serve with bread and pickles.

Enjoy!

Winston Collectramatic Pressure Fryer: Benefits for Fried Chicken

Fried chicken

Poultry Trivia:

  • More than half of all chicken entrees ordered in restaurants are for fried chicken.
  • In 2020, 95% of commercial restaurants had fried chicken on their menu.
  • The average American eats over 80 pounds of chicken each year.
  • According to the National Chicken Council, more than 1.4 billion wing portions were consumed on Super Bowl Weekend in 2020 (more than 100 million pounds).

What menu item is going to keep customers coming back for more? To-go orders? Catering offerings? What is going to set your operation apart from your competition? Fried chicken! It’s the ultimate comfort food; perfect for challenging times.

Let’s look at the features and benefits of our Collectramatic® Pressure Fryers. Available in 4-head (32 pieces per drop) and 6-head (48 pieces per drop) configurations.

Fried chicken

Benefits of Pressure Frying:

  • Quicker cook times
  • Juicier product
  • Tenderization
  • Texture control
  • Healthier product

Benefits of a Winston Collectramatic Pressure Fryer:

  • Microprocessor controller
  • Reliability – Very few moving mechanical parts to wear out or break.
  • Round pot – For strength with a single weld, sediment cannot build up in the corners and continue to cook/burn the oil.
  • Footprint – It’s all in the numbers. With a LP56 fryer 6-head, you can fry approximately 192 pieces per hour and 1,200 pieces before you need to filter the shortening. Our collector, the largest in the industry, catches all the sediment from the cooking vat, so it does not continue to cook.

At a recent training, with an install of three LP56 Collectramatic fryers, the customer was able to pressure fry 576 pieces per hour and 3,600 pieces before they needed to filter the shortening.

To really boost your program, partner your fryer with a Winston Shortening Filter and a CVap® Holding Cabinet or two, and now you have a fried chicken program sure to bring the hungry crowds through the door!

who doesn't love drumstics?
quarter rack basket to maximize production
wing it!