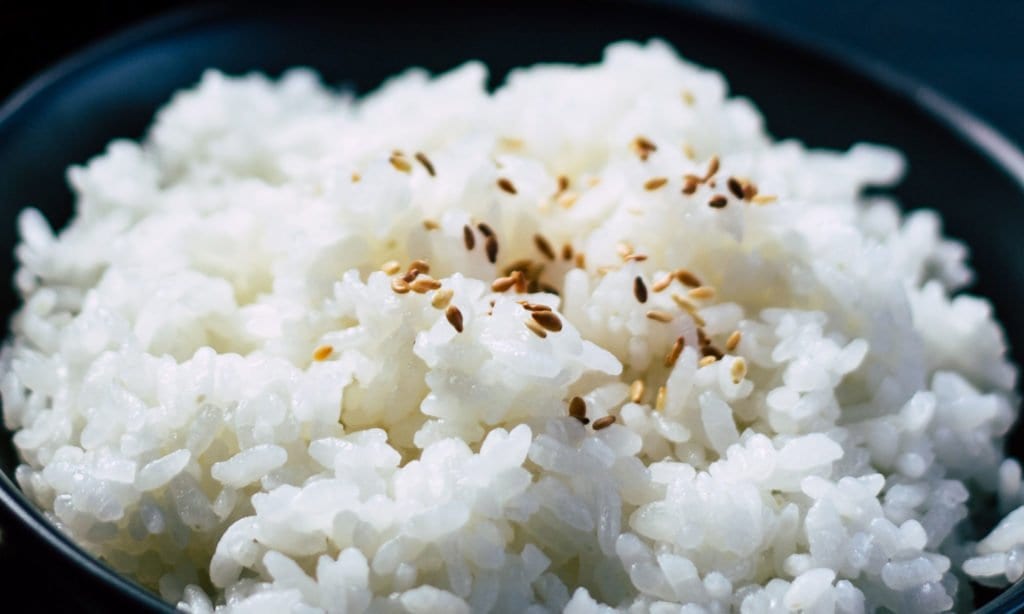
CVap® Pork Butt: How to Cook a Pork Butt

pulled pork butt

Boston butt or pork butt is the American name for a cut of pork that comes from the upper part of the shoulder from the front leg and may contain the blade bone. Boston butt is the most common cut used for pulled pork. Despite the name, it does not come from the pig’s rear end.

 Okay…I will admit I never used to be much of a pork fan. Before you gasp in horror, let me explain! When I was growing up, my folks served pork chops that were thrown on a dry frying pan for probably 25 minutes per side, and I honestly think shoe leather would have been easier to eat! This is one food memory I simply cannot forget.

That was then. Now I have CVap on my side, and I’ll never have to eat a dried-out, chewy piece of pork again.

pork butt quesadillas

Let’s get down to business. I wanted to create a tender, moist, sweet piece of pork that I could shred for quesadillas. In this case, I made a small roast to feed a few people. If you are feeding the masses, simply increase portion size. I used pre-packaged ingredients for convenience, but you can experiment with flavor combinations. I have two hungry boys at home (one of whom eats so fast I wonder if he can taste his food!) and they both love this recipe and ask for it repeatedly.

Ingredients

Instructions

  1. Preheat CVap Cook and Hold Oven to Vapor 175°F/Air 205°F
  2. Place pork in the steam table pan.
  3. Mix all the ingredients in a separate bowl and pour over the pork.
  4. Put into the CVap oven. Set cook time for 6.5 hours, and hold for 150°F, infinite. Push start, and walk away.
pork butt in hotel pan
pork butt in marinade

At this setting, the oven will hold at 150°F when the cook cycle is complete. Following the cook cycle, I usually shred the pork and put it back into the oven for approximately 1.5 hours before serving. It always turns out great! Sweet flavor all the way through and perfect texture. Accompany the pork with some black beans and cilantro lime rice, and the family is well on its way to full and happy bellies. If you’re not a fan of pork butt, this recipe will make you a believer!

pork butt
Fun Facts About Pork Butt

The pork butt is a moderately tough cut of pork with lots of connective tissue.

The name makes sense when you consider that the word “butt” can also mean the thicker end of something (like the butt of a gun) or the blunt end of something since a pork butt is the thicker end of the shoulder cut. Pork butt cuts are relatively inexpensive, compared to some other pork cuts.

How to Cook Pork Butt

Pork butt does best with long, slow cooking, which is why CVap ovens are so ideal. Butts are great choices for barbecuing, braising, and stewing. They stand up well to strong flavors because they have a strong flavor themselves. This is because the meat is derived from a hard-working section of the pig. Carrying around all the weight exercises that portion and results in it developing great flavor. This is especially true of pastured pigs raised in environments where they can walk around.

What Does Butt Taste Like?

Sorry, couldn’t resist that heading. The fat content in pork butt gives it more flavor and naturally bastes the meat. Long, slow cooking on low heat brings out the juices and makes for a tender, more succulent cut of meat. The low heat breaks down the connective tissue, slowly dissolving it away. That’s why pork butt benefits from holding in a CVap for a while after the cooking cycle is complete. The low heat just keeps making the butt more tender (and tasty).

You can, if necessary, use a pork butt and pork shoulder interchangeably in most recipes. Pork shoulder is a bit better if the final plan is to slice or chop the meat and have it hold its shape, while the more intense marbling of pork butt makes it particularly well suited for barbecue, specifically making pulled pork or other recipes where you want the meat to fall apart into shreds easily.

Why is it Called Boston Butt?

Pork butt is sometimes called Boston butt. Why? Like a lot of food terms, there’s a bit of debate. One theory was that it referred to the barrels used to ship pork products from Boston. But then, Boston was never really a center of pork production, so that theory doesn’t really hold up. It’s much more likely that as the term came to be accepted as railroads made standard cuts more widely accepted. Think New York strip or St. Louis ribs. In that context, Boston butt makes more sense.

CVap Korean Chicken Wings

korean chicken wings

Create a big demand for chicken wings by serving this sweet and spicy take on the beloved wings. This recipe came to us from chefs John McCarthy and Ben Freemole. These accomplished chefs developed this dish at The Crimson Sparrow in Hudson, New York. Although the restaurant has since closed, chefs McCarthy and Freemole have moved on to bigger things.

This advanced staging process enables you to have an order ready to serve in minutes. Whether you devour them yourself or share them with your patrons, taste buds everywhere will be celebrating!

crimson sparrow chefs

Recipe: Korean Chicken Wings

Ingredients

  • Chicken Wings, 2 to 3 lbs.
  • 1/3 Cup Gochujang Chili Paste
  • 1/3 Cup Soy Sauce
  • 1/3 Cup Molasses
  • 3 ½ Tbsp Ginger
  • 3 ½ Tbsp Sesame Oil
  • 1 ¾ Tbsp Mirin
  • 3 Tbsp Pineapple Juice
  • 1/3 Cup Sugar
  • 2 ½ Tbsp Garlic Cloves
  • 1 ¾ Tbsp Fish Sauce
  • One Scallion
korean chicken wings

Preparation

 
  1. For the brine: combine water, 3% salt, and 6% sugar. Bring to a boil and cool completely before adding the chicken wings. Brine for six to eight hours.
  2. For the chicken: Preheat a CVap® Cook and Hold Oven to Vapor 156°F/Air 156°F. Remove wings from the brine and rinse. Place in a pan, then cook in the oven for four hours. Remove and cool the wings.
  3. For the sauce: Heat the soy sauce and sesame oil, add the sugar, and stir to incorporate. Add all of the ingredients to a blender and puree until smooth. Reserve for service.
  4. To fry the wings: toss wings in Mochi flour (sweet rice flour) to coat. Fry in oil at 375°F for approximately three minutes. Drain the wings and toss with the sauce to coat. Serve immediately.
Chef John McCarthy

Want to learn more about Chef John McCarthy? Check out his interview in our Operator Corner.

For more information about staging and wings, take a look at our blog post detailing how much time you can shave from ordering to serving one of America’s favorite finger foods, Staged Wings in CVap.

CVap Saltimbocca, Southern Style!

Savory Saltimbocca

Saltimbocca is a dish traditionally made of veal, lined or topped with prosciutto and sage. In addition, it is marinated in wine, oil, or saltwater, depending on the region (or one’s own taste). Saltimbocca (Italian: jumps in the mouth) is occasionally topped with capers. This savory dish is popular in southern SwitzerlandItalySpain , and Greece)

Although veal and prosciutto are the traditional proteins in this dish, our saltimbocca features chicken thighs as the primary protein. The Southern spin comes from wrapping the thighs with ham (butchered and cured in the European style). The southern charm was amped up by serving the Saltimbocca over Weisenberger grits mixed with Kenny’s Farmhouse Cheddar Cheese.

saltimbocca yummy

The Process

We boned, skinned, and brined the chicken thighs. After that we wrapped them in the reserved skins and roasted them in a CVap Cook and Hold Oven at 165°F Vapor/195°F Air (legacy 165°F + 30) for 30 minutes. The roasted thighs were held in the CVap oven until we were ready for finishing. To finish, we removed the chicken skins, wrapped the thighs with fresh sage leaves, cheddar cheese, and ham. Finally, we pan-seared them to crisp the ham. The finished dish was held until we were ready to plate. As you can see, the thighs remained incredibly juicy, while the ham achieved the exact crisp texture we wanted.

saltimbocca chicken wrapped in ham

Meanwhile, we sautéed sliced cremini mushrooms with chopped onion and garlic, then reduced them with stock and a generous amount of butter.

We mixed the grits with chicken stock and cheddar, covered the pan with foil, and cooked it in a CVap Cook and Hold Oven at 200°F Vapor/300°F Air (legacy 200°F + 100) for an hour. For plating, the grits were topped with a salad of heirloom tomatoes tossed in a honey-thyme vinaigrette. Gorgeous all by itself!

Finally, we topped the grits and salad with one of the saltimbocca chicken thighs and a generous ladle of the sautéed mushroom mixture. The finished plate was as delicious as it was beautiful!

cremini 'shrooms for saltimbocca
grits and salad for saltimbocca
finished saltimbocca

Lobster and Fresh Corn Chowder with CVap Staged Scallops

lobster for corn chowder

What better way to celebrate the transition from summer to fall than to create a hearty chowder? We prepared this savory dish with lobster, fresh corn, and scallops. The layers of flavor in this dish are subtle, yet satisfying. You’ll want to make it again and again.

The Process

We butter-poached lobster tails with thyme and lemon in a CVap Cook and Hold Oven at 200°F Vapor/200°F Air (legacy 200°F + 0) for 12 minutes. Next, we removed the meat from the shells and returned it to the oven to hold until plating.

Meanwhile, we used the shells to make stock. Next, we added corn milk and cobs remaining from stripping the kernels (which were reserved) from fresh ears of corn. We also added onions, celery, carrots, bay leaves, and thyme. This was placed in the CVap oven at 180°F Vapor/180°F Air (legacy 180°F + 0) and simmered all day.

seafood broth with lobster and scallops
brunoise cooking
Searing the Scallops
brunoise on the plate

We sauteed a brunoise of new potatoes, onions, celery, and carrots in butter. Next, we added the reserved corn kernels, bay leaves, salt, and pepper. This mixture went into a CVap Holding Cabinet. We also staged some gorgeous sea scallops in a CVap oven at 126°F Vapor/126°F Air (legacy 126°F + 0). These held until we were ready to bring everything together. We pan-seared the scallops to finish them.

First onto the plate was the sautéed vegetable mixture, topped by the poached lobster tail meat. Next came two pan-seared scallops. Finally, the dish finished with a generous ladle of broth that cooked all day.

The final dish was sublime.

lobster and scallop stack
ladle broth onto the plate
Lobster and Fresh Corn Chowder with Scallops

Can’t wait to make – and eat – this again!

To learn more about CVap staging and the possibilities it can bring to your kitchen and speed of service, download the FREE Staging eBook:

Pork Loin-Pretzel Bun Sliders

Petzel bun baked in a CVap retherm oven

Each component of this sandwich is delicious on its own. We started with the pretzel buns, which provide the perfect framework for the other flavors. Pretzel dough adds something special to a sandwich, elevating our enjoyment of it. Is it the distinctive chew unique to pretzel dough? Is it the slightly crunchy exterior of the roll? Whatever the attraction is, you can’t deny that pretzel rolls add something very different to any sandwich. These sandwiches have been appearing on menus everywhere.

Mini Pretzel Buns in CVap®

We’ve been experimenting with sandwiches of all sorts. In this case, we experimented with creating a slider-sized version of a pretzel roll using a CVap oven. CVap technology is excellent at proofing and baking varieties of bread, buns, and rolls.

events

Ingredients

Dough

  • 1 Cup Milk
  • 2 Tbsp Butter
  • 2 Tbsp Brown Sugar
  • 1 Envelope Rapid Rise Yeast
  • 2 Tsp Salt
  • 3 Cups All-Purpose Flour

Boiling Solution

  • 3 Quarts Water
  • 3/4 Cup Baking Soda

Egg Wash

  • 1 Egg
  • 1 Tsp Water
pretzel dough for sliders

Directions

Directions

Heat milk and butter to 105°F. The butter will not completely melt. Combine with yeast and brown sugar in a mixer bowl. Stir in salt and two cups flour and beat for three minutes. Gradually add enough of the remaining flour to make a soft dough. Mix on low for approximately 5-8 minutes to develop elasticity. Place in an oiled bowl. Cover the bowl. It will take approximately one hour for the dough to double in size.

  1. If using a CVap Cook and Hold Oven, program it to a Food Temperature setting of 130°F Vapor/350°F Air (legacy 130°F (Doneness) and a Food Texture setting of 10 (Browning)), with Constant Cook ON, and set the timer for 20 minutes. If using a CVap Retherm Oven, set it to Channel 7 and set the timer to 14 minutes.
  2. Combine boiling solution and bring to a boil. Punch dough down, divide into two equal portions, and roll into a log approximately 2″ in diameter. Cut each dough log into approximately 6-12 individual balls, dependent upon the size buns you desire. Form into tight rolls and boil all rolls for approximately two minutes. Next, use a slotted spoon to remove rolls from boiling water.
  3. Place rolls on parchment-lined baking sheets and brush with egg wash. Cut across each roll with very sharp knife. Place in oven and bake for recommended time based upon oven selected. Remove from oven and place on wire racks to cool.

This gave us the exact exterior color and texture we were seeking.
The interior had just the right chew without being too “doughy.”

Pork Loin Sliders

Ingredients (per slider)

Directions

Pork Loin Preparation

  1. Program a CVap Cook and Hold Oven to a Food Temperature setting of 135°F Vapor/135°F Air (legacy 135°F (Doneness) and a Food Texture setting of 0 (Browning)). Allow about 30 minutes for pre-heating.
  2. Arrange the pork loin on a parchment-lined sheet tray.
  3. Place the pork into the preheated oven.

It should take about an hour for the pork to reach 135°F, the minimum endpoint temperature.  Preparing the pork in this manner (staging) will save a great deal of time during the finishing process!

Apple-Cabbage Slaw

Directions

Preparation

  • Sliced Granny Smith Apples
  • 1/2 head green cabbage (sliced)
  • 1/3 cup sugar
  • 1/4 cup cider vinegar.

Combine slaw ingredients. If you want a creamier slaw, mix in one or two tablespoons of mayonnaise. Adjust seasoning to taste, and add salt and pepper if desired. For more acidity, add a squirt of fresh lemon juice.

Pretzel slider bun with pulled pork loin and slaw

To learn more about staging and the possibilities it can bring to your kitchen and speed of service, download the FREE eBook:

Blushing CVap Shrimp and Lobster Pasta

Lobster-Shrimp-Pasta

We wanted to make something comforting yet elegant, an al dente linguine tossed in a velvety blush sauce. First we cooked lobster tails and shrimp in a CVap® Cook and Hold Oven. The flavor and texture of the shellfish added a level of decadence to the dish that made it truly special. Let’s deconstruct it!

lobster tails cooked in CVap
shrimp cooked in CVap

First, the shellfish. A CVap Cook and Hold Oven steamed the lobster tails at 200°F Vapor/200°F Air (200°F + 0 in legacy) for about seven minutes, bringing them to the perfect temperature and texture for this dish. We staged the shrimp in the same oven, at 135°F Vapor/145°F Air (135°F + 2 legacy) for about ten minutes. This made the shrimp nearly – but not quite – opaque.

We cooked traditional linguine while the shellfish was steaming. The pasta cooked to al dente, tossed with a bit of olive oil, and held in a CVap Holding Cabinet at 140°F Vapor/140°F Air (140°F + 0 legacy) until we were ready to plate.

On to the sauce! We combined olive oil, garlic, onion, San Marzano tomatoes, salt, pepper, and fresh basilto create a classic marinara.

After that, we added heavy cream to create a gorgeous blush sauce.

linguine tossed with EVO
Marinara sauce
blush sauce

Mix It All Together

We removed the lobster tail meat and reserved the shells, along with the shrimp shells, to make stock later.

Meanwhile we cubed and stirred some of the meat into the blush sauce. The rest was set aside to be added whole.

We coated a portion of pasta we’d been holding with the seafood/sauce mixture…

shellfish shells saved for stock
lobster meat added to blush sauce
lobster meat on cutting board
Adding blush sauce to pasta

Plate It

Gilded the lily by crowning it with the whole piece of shellfish, a bit more sauce, and a garnish of fresh basil.

The natural sweet flavor of the shellfish really came through, complimented nicely by the simple blush sauce. And the fresh basil added just the right amount of bright, yet peppery foil to the richness of the overall dish.

shimp added to lobster blush pasta
Lobster blush pasta - the finished dish

Butter-Poached Lobster with Thyme and Lemon

Lobster with thyme and lemon

Lobster is the ultimate decadent luxury. History shows us that wasn’t always the case.

People once considered it a trash food fit only for the poor. The crustacean was considered the “cockroach of the ocean.” Americans started regarding it as ‘fancy’ food in the 1950s. You can read more on how it gained its lofty reputation in  “How Lobster Got Fancy!”

Lobster is heart-healthy food, being lower in calories, cholesterol, and saturated fat than lean beef, white meat chicken, pork, and even shrimp. Grilled, steamed, boiled, poached…no matter how you serve it, nothing can top properly prepared lobster!

Lobster with thyme and lemon

The Process

We butter-poached tails with thyme and lemon in a CVap oven at 200°F Vapor/ 200°F Air (Legacy 200°F + 0) for 12 minutes. Next, we seasoned them with salt, pepper, and lemon butter. We served them with a spring vegetable medley of fresh asparagus and sweet baby carrots, all steamed in a CVap oven. This dish tasted like seaside sunshine!

The butter-poached lobsters were cooked at two different settings for testing purposes in a CVap Cook and Hold Oven – The results are below:

Doing Lobster Up Differently

Below are some different ways to cook delicious decapods.
Consider these serving ideas:

  • Spread pesto on a pizza crust and top with chunks of tail meat, grilled or roasted corn and asparagus, dot with small bits of brie and bake – how decadent!
  • Drizzle sesame, ginger, and lime over Vietnamese-style lobster and vegetable spring rolls in rice paper wrappers.
  • Serve citrusy ceviche with avocado and yucca chips.
  • Sauté in a spicy tomato sauce and serve over pasta for Lobster Fra Diavolo.
  • Substitute it for Canadian bacon for the most indulgent eggs benedict imaginable.
  • Ditch the chicken and go all out with lobster pot pie!
  • Take your bisque in an Asian direction with a hint of curry and curried croutons for topping.

New CVap models 160°F Vapor/165°F Air and 145°F Vapor/145°F Air

test results - butter poached lobster

Kickin’ Chicken Noodle Soup: A Bowl Full of Delicious!

chicken noodle soup stewing

There’s something deeply satisfying about chicken noodle soup. It resonates with most people. It’s good for the body. Soothing for the soul. It transports you to a nostalgic happy place from your childhood. Chicken soup is transcendental.

It can also be an eloquent expression of different techniques. We utilized both CVap® and Collectramatic® equipment to create a chicken soup with a robust flavor profile and a broad range of textures.

For the broth, we combined chicken carcasses and aromatics, including carrots, onions, celery, thyme, sage, parsley, and rosemary. It was slowly reduced in a CVap Cook and Hold Oven set at 180°F Vapor/210°F Air for eight hours, with Constant Cook ON.

chicken soup stock
Chicken thighs were vacuum-sealed with olive oil and salt and poached at 165°F Vapor/175°F Air for two hours with Constant Cook ON. The result was a confit with an almost buttery texture. We removed the skin from the poached chicken and open fried it in a Collectramatic fryer at 350°F for four minutes.
chicken poached in CVap
deep frying chicken skin in collectramatic
Next we steamed celery, carrots, and onions in a CVap at 200°F Vapor/200°F Air for one hour. After that the steamed veggies joined the stock. This tasty concoction was held until it was time to assemble the plates. We purchased fresh noodles from Whole Foods Market and steamed them at the same settings as the vegetables.
adding veggies to the chicken broth
what's chicken soup without noodles.

Next came the plating. We started with the steamed noodles and topped them with the vegetables, followed by pulled confit of chicken.

Finally, we poured hot stock over the bowls and garnished with fresh herbs and the fried chicken skin crisps.

The final result was a soup that was blissful. It combined so many textures and flavors. Our tastebuds were delighted, and our souls satisfied.

noodles and chicken plated
herbs for chicken soup

It just doesn’t get more satiating than that!

choppin chicken
chicken noodle soup stewing