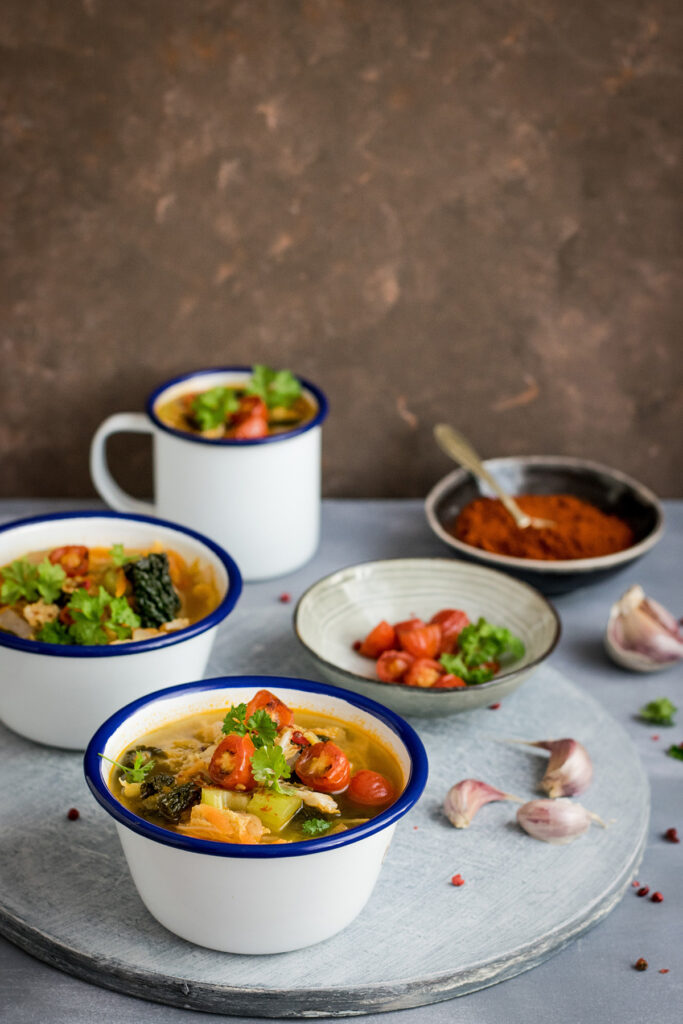
Chef Sam’s Award-Winning Rainbow Vegan Chili

vegan chili

Winston’s Chef Samantha Brown loves a good challenge. She is passionate about food and serving people. When she came across a contest sponsored by Campbell’s Foodservice, it was right in her wheelhouse. The contest, Campbell’s Can Do Recipe Contest for Healthcare, challenged entrants to develop new recipes using one of a select variety of Campbell’s Condensed Soup as a key ingredient. Because the contest was specifically aimed at healthcare, ingredients, and nutrition were major factors.

Chef Sam not only entered the contest…SHE WON! Sam’s first-place entry means she’s earned a sweet $2,000 prize, and the opportunity for an additional $500 if Campbell’s online followers agree that her recipe is indeed the best of the top three entries.

One might assume that Chef Sam prepared this award-winning dish on a stovetop. But because she is always looking for ways to demonstrate the versatility of our CVap® ovens, she did it all in a CVap Cook and Hold Oven.

Winning the Campbell’s Soup contest has inspired me to keep following my intuition and harnessing my experiences in creating meaningful connections through food,” said Chef Sam. “This Rainbow Vegan Chili is a cold-weather comfort food with a twist that uses plant-based beef, a mélange of veggies, and Campbell’s Classic Tomato Soup to tie it all together. Can you believe I created this recipe in a CVap oven?

CVap® Advantages

CVap@ Cooking and Holding Processes

There are advantages to preparing this chili in a CVap oven. It can be cooked and held in the oven, which allows a much longer serving time. Likewise, you can hold a large quantity without worrying about scorching the pan bottom or reducing too much. The last bowl you serve will be as fresh and hot as the first.

Want to try this recipe? Chef Samantha cooked it all at 200°F Vapor/350°F Air in a CVap oven. But if you don’t have a CVap oven handy, a stovetop will do.

Rainbow Vegan Chili Recipe

Ingredients

  • Plant-Based Beef 48 oz (4-12oz packs)
  • Sweet Onions 4 large (1 ½ quart) – Cleaned and diced.
  • Sweet Peppers 6 large (1 ½ quart) – Cleaned and diced
    (red, yellow, and orange)
  • Carrots 1 ½ pounds
  • Whole Garlic Cloves 3 cups (Cleaned, peeled, and minced)
  • Chili Powder 4 Tablespoons
  • Coriander 1 Tablespoon
  • Cumin 1 Tablespoon
  • Smoked Paprika 1 Tablespoon
  • Chipotle Peppers 4 Tablespoons – Pureed
  • Kidney Beans 62 oz (4 – 15.5 oz cans) – Drained
  • Fire Roasted Diced Tomatoes 58 oz (4-14.5 oz cans) – Liquid Drained
  • Petite Dice Tomatoes 58 oz (4-14.5 oz cans)
  • Campbell’s Tomato Soup 70 oz
  • Water 128 oz

The Process

  1. Brown the plant-based beef.
  2. Add onion and peppers to the pan and allow to sweat until onions are translucent and the peppers have softened.
  3. Add minced garlic and carrots to the pan and toss until fragrant.
  4. Add chili powder, coriander, cumin, smoked paprika, and pureed chipotle peppers to the pan, and mix thoroughly. Allow to sauté for a few more minutes.
  5. Add drained beans, all the diced tomatoes, tomato soup, and water, mix thoroughly and bring to a boil, stirring frequently.
  6. Simmer for about an hour.

As you can tell from the ingredient quantities, this recipe is intended to feed a bunch of people. You’ll get about five dozen eight-ounce servings. And while it’s dang tasty, it’s amazingly healthy, with just 128 calories per serving.

Want more chili ideas? Check out Sam’s recipe for Beer Chili!

Easy Soup Recipes to Warm Your Menu This Winter

It’s winter in the Northern Hemisphere. Most humans are hard-wired to crave comfort foods in freezing weather. Of all the comfort foods, soups seem to be the best at warming our innards. Many folks think of soup as something that’s prepared on a stovetop. But CVap® ovens are also great for making soup. You can scale the process up to crank out gallons of soup to keep your sales hopping all day. It doesn’t matter whether you’re making soup from scratch or retherming pouches of premade soup – CVap’s got you covered.

Here are a few great easy soup recipes you can whip up in a CVap oven.

What soup is more comforting than chicken noodle soup on a frosty winter day? It’s one of those flavors that instantly takes you back to being a kid. It’s particularly good when you’re battling a cold. That’s not a superstition. Evidence has shown that chicken noodle soup can reduce cold symptoms. It’s chock-full of electrolytes, which help you stay hydrated.

Our chicken noodle soup take utilizes CVap ovens and our Collectramatic® Fryers. The result was a soup that combined many flavors and textures. It’s sure to warm the coldest heart. Check out the recipe here.

This flavorful broth recipe has some good bones – literally. It calls for over eight pounds of beef, pork, and poultry bones, roasted in a CVap oven. This recipe is one you’ll need to plan, as it calls for simmering for at least 12 hours.

Pho (pronounced fah) is a Vietnamese staple. There are countless variations of this easy soup recipe. Our recipe is rich in different flavors and textures. You may want to consider offering this as part of a Tết celebration, Vietnam’s observance of the Lunar New Year.

Here’s a tasty chowder that’s a little decadent. The chowder recipe includes lobster, scallops, veggies, and a brunoise of new potatoes, onions, celery, and carrots. The advantage to preparing this chowder in a CVap oven is that you can stage all the key ingredients in the CVap while the lobster shells enjoy a day-long simmer to create a stock. At serving time, the scallops just need a quick sear to finish. Then the impressive final dish is assembled – with a base of veggies, topped by lobster meat, a couple of scallops, and a generous ladle of the lobster stock. It’s a soup that’s as impressive to look at as it is to eat. It’s a perfect soup on a frigid day to make diners daydream of warm days near the ocean.

Chili is great any time of year. But it really hits the spot in the wintertime. You can spice it up with as much extra heat as you want to bring some warmth to a cold day.

A customer challenged us to see if it was possible to prepare beer chili using just a cook and hold oven. As this recipe shows, it’s not only possible but also awesome. So, bring on the beans! Bring on the meat! Chilly weather is chili weather!

By the time mid-winter gets here, we’re sick of it. Good thing Mardi Gras comes around to add some color and fun to the never-ending greyness of late February. And we’ve got the perfect dish to inject a little Cajun flavor into your menu.

This spectacular gumbo has it all: veggies, sausage, chicken, and crawdads. Like many great soups, you’ll want to let it cook overnight to coax every bit of flavor. A little roux, a little rice, and you got yourself some great gumbo.

Behind every great easy soup recipe is an outstanding stock. In this post, Chef Sam walks us through how to use your CVap oven to create gallons of chicken stock. It’s the perfect base for multitudes of soups. The important thing about this stock is that it can easily be frozen to use at another time. And it makes the most of the chicken, with virtually nothing going to waste.

Retherming Soup in CVap

So far, we’ve elaborated on some great scratch recipes you can make in a CVap. But many excellent pre-prepared canned or bagged soups are available from your favorite foodservice distributor. Use a CVap oven to retherm your premade soups, and you can really scale up production. Our largest ovens can hold up to 28 hotel pans, allowing you to cook gallons of soup at once. CVap technology ensures that no matter what soup you’re retherming, it will never scorch or overcook. And CVap oven’s automatic hold cycle keeps soup hot and fresh throughout your meal service.

bagged-soup

From Soup to Nuts

These are just a few ideas for souping up your menu. Need more ideas or suggestions for adapting an existing recipe to CVap? Just fill out our contact form. Our culinary experts will be happy to help! There’s no need to limit questions to soup. We can help with just about anything!

Beer is good. Chili is good. Beer Chili is AWESOME!

mmm...beer chili

Cooking Chili in an Oven?

Chili is a perennial favorite. At the request of a customer, we tested the feasibility of using a CHV oven alone to cook beer chili. The challenge was to see if a small kitchen with just a CVap Cook and Hold Oven could successfully pull this off. Spoiler Alert – yes it can!

Random Chili Factoids

Chili has a murky history. Several sources claim credit for this spicy concoction. Like many “ethnic” dishes popular in the US, chili seems to be uniquely American. The common consensus seems to be that it originated in Texas, as a dish that was cheap to make. Therefore it enabled folks to feed many mouths with relatively little meat.


mmm...beer chili

The Good, The Bad, and the CINO

There are many popular variations of chili – nearly all are delicious. We will not speak of the abomination that is “Cincinnati style” chili – it’s CINO (chili in name only). Yes, we did make up that acronym. Feel free to make it a buzz word.

This beer chili recipe came from our customer. It is delicious. You WILL want to try it!

The Bean Base

  • 16-oz. Dried Pinto Beans
  • 4-oz. Chopped Garlic
  • 128-oz. Water

The bean base was cooked overnight in a CHV5-05UV oven, preheated to 200°F Vapor Temp/250°F Air Temp. This gave the dried beans ample time to soften. In addition, the garlic infused the liquid with its flavor.

Subsequently we divided the bean base in half the next day, using two 4” hotel pans.

Beer Chili Meat

  • 24-oz. (two 12-oz pkgs) Turkey Bacon
  • 2T + 2tsp Onion Powder
  • 2T + 2tsp Ground Coriander
  • 1T + 1tsp Dried Chipotle Peppers
  • 4T Ground Chili Powder
  • 6-lbs. Ground Beef
  • 10 each, 16-oz. cans Fire Roasted Diced Tomatoes
  • 4 each, 29-oz. cans Tomato Sauce
  • 4 each, 12-oz bottles Beer
  • Salt and Pepper to taste

We used two separate channels to cook the different elements of the beer chili.

  1. Channel 1 – Cook Time Infinite / Vapor OFF / Air 350°F / High Yield OFF.
    This channel browned the meat, turkey bacon, and seasonings. We wanted to create a dry environment, with the water in the evaporator only contributing passive vapor to the oven.
  2. Channel 2 – Cook Time Infinite / Vapor 200°F / Air 350°F / High Yield OFF
    This was for the final cook of the chili (and retherming the beans).
beef and bacon for beer chili
meaty for beer chili
beer for beer chili

Process:

Start PROGRAM #1:

  • PREHEAT two 4” full hotel pans in the CHV oven while the oven is preheating (trust us, this will speed the cooking process). Above all, we were trying to leverage every bit of heat energy we could, since this will be the only piece of equipment in the customer’s kitchen.
  • Add three pounds of ground beef, breaking up a bit by hand, into each of the HOT pans, taking a minute or two to break up the meat with a spoon, spatula, or gloved hand. After that, return the pans to the heated oven for another 10 to 15 minutes.
  • Remove pans, break up the meat more. Subsequently return to the oven for an additional 10-15 minutes.
  • While the ground beef is browning, combine the sliced turkey bacon and seasonings into two containers (keeping in mind that we’re making two batches of chili).
  • Remove the pans of ground beef, break up the meat again, add the turkey bacon and seasonings, mix thoroughly. After that, return to the oven for another 10-15 minutes.
  • Remove the pans of cooked ground beef.
  • Finally, end Program #1.

Start PROGRAM #2

  • Combine both pans of cooked meats and seasonings into a single pan.
  • Subequently, in the newly empty 4” pan, deglaze with ALL the beer, tomato sauce, and diced fire roasted tomatoes.
  • Return both pans to the oven. No need to wait for the oven to fully preheat to program #2 presets.
  • Continue to cook both pans for about an hour. As a result, the meat and seasonings will add color and meld flavors. In addition, the liquid ingredients will come up to temperature and start to merge flavors.
  • Remove both pans and combine into a single pan. Mix thoroughly.

Divide and Conquer

  • Divide the completed pans of chili into two. We wanted to decrease the thermal load in the oven and cook more quickly.
  • Return both pans of chili back into the oven to cook for a final hour.
  • Finally, divide the beans base that cooked overnight into the beer chili.
  • The completed recipe  spent about an additional hour in the oven, until the temperature measured at least 180°F. The elevated air temperature allowed some evaporation to occur, which thickened the chili just a bit, and enhanced the flavor.

Final Results

In conclusion, the results were great! We were successful in proving that beer chili could indeed be prepared in a single oven. Consequently, we got to enjoy a few bowls of some butt-kicking chili!

what's beer chili without beer?
mixin' the fixin's for beer chili
Chili Done Pans