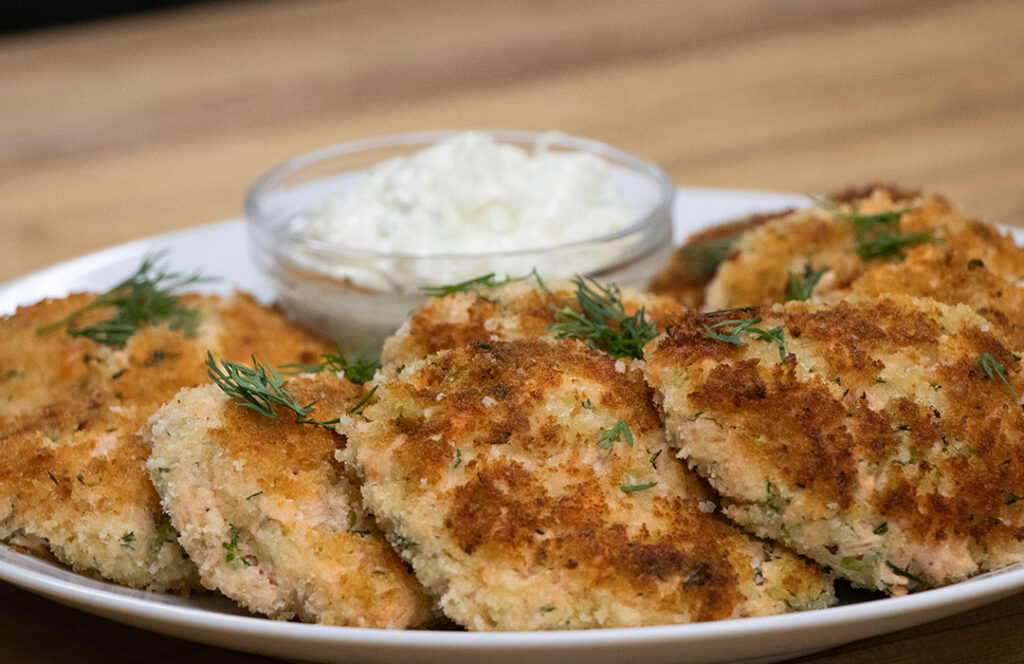
Holiday Recipes: CVap® Oven Recipes to Snazz Up Your Holiday Restaurant Menu

Holiday Recipes

The holidays can be a make-or-break time for restaurants. Take advantage of your CVap oven to expand your menu. Your guests are ready to celebrate. These recipes will send ’em home feeling festive and full. It may just help you keep things in the black.

Hanukkah

This year Hanukkah begins on December 18 and ends on December 26. Two perennial Hanukkah favorites are brisket and roasted chicken. We have some great recipes for both.

Retherming Brisket in CVap

Brisket is growing in popularity. In the last decade, it has grown in popularity by 23 percent. Brisket is a relatively tough cut of meat. It must be cooked low and slow to break down its connective tissue. But if you don’t have the time or patience for a traditional cook, CVap can help you save time and effort. By cooking ahead of time and refrigerating, you can serve fresh brisket in a fraction of the time it takes to cook from raw. There are also quality commercial products, such as Hormel’s sliced brisket. These will save tons of time compared to cooking from scratch. Whether thermalizing your brisket or serving a prepacked product, CVap will help satisfy your guests. Read more here: Retherming Brisket in a CVap Oven.

retherming brisket

Beautiful Beef Brisket: Smoky, Juicy, and Tasty!

Do you have the time to cook a traditional brisket? We’ve got you covered. This blog describes how to smoke an incredible brisket: Beautiful Beef Brisket: Smoky, Juicy, and Tasty!

CVap Roasted Chicken with Root Vegetables a la Thomas Keller

Are your guests more inclined to prefer chicken over beef? This roasted chicken and root veggie recipe is as hearty as it is easy. Shared with us by our late friend Chef Jim Waley, it’s an adaptation of a recipe by Chef Thomas Keller. Learn how to prepare it here: CVap Roasted Chicken with Root Vegetables a la Thomas Keller

Corned Beef in CVap

Some customers will prefer their brisket as corned beef. We tackled that project too. This scratch recipe tested different cook settings to determine the best method for both sliced and shredded corned beef. Please read it here: Corned Beef in CVap.

roast chicken thomas kellar

Christmas

Turkey

Turkey is the center of many Christmas celebrations (not to mention Thanksgiving). Over the years, we’ve tested many turkey recipes in CVap ovens. They all produced excellent results. Rather than giving a synopsis of each recipe, we’ll list them here:

What the Turducken!

Want to give your Christmas celebrants a treat that they’ll never forget? Serve them turducken. Although the word starts with “turd,” it’s a culinary treat that few are willing to invest the time and effort in preparing. Turducken is a turkey stuffed with a duck, stuffed with a chicken, all layered with dressing. It’s a nutritionist’s nightmare but a diner’s fantasy. If you’re up to the challenge, learn how here: What the Turducken!

Turducken

Kwanzaa

Kwanzaa is a relatively new holiday, dating from the mid-1960s. It celebrates African-American culture. The name Kwanzaa derives from the Swahili phrase matunda ya kwanza, meaning “first fruits.” It’s based on the harvest traditions of parts of West and Southeast Africa. It occurs from December 26 to January 1 each year.

Kwanzaa food traditions are varied as the African diaspora. Popular dishes for this holiday are influenced by the cuisines of Africa, the Caribbean, South America, and the American Deep South.

holiday-recipes

CVap Gumbo Ya Ya!

A fantastic and easy dish to serve your Kwanzaa guests is gumbo. It’s inspired by the cuisine of Louisiana and is packed with robust Cajun flavor. It features chicken, sausage, and crawdads. Please read up on it here: CVap Gumbo Ya Ya!

Shuckin’, Crackin’, and Peelin’ – Let’s Dish Shellfish!

Treat your guests to the flavors of the Gulf Coast with this wide-ranging assortment of shellfish. There’s something here to please every seafood fan. Check out the recipe here: Shuckin’, Crackin’, and Peelin’ – Let’s Dish Shellfish!

New Year's Day

Staging Lobster Tails for Catering

Want to really impress the folks celebrating New Year’s Eve in your restaurant? Nothing is more impressive than lobster tails. It’s hands-down the best part of this celebrated crustacean (and not nearly as challenging to eat as tackling an entire lobster). This recipe takes them from frozen to fantastic in about an hour. Read how here: Staging Lobster Tails for Catering.

The Day After

Yeah, we know, everybody starts a diet on New Year’s Day. But after a night of celebration, some folks are still going to want to start the new year with a great breakfast.

CVap Quiche with Fresh Kale

This quiche is easy and pretty nutritious. Hey, if it’s got kale, it can’t be all bad! Your guests will love it, even if they can’t pronounce it. Whip it up with this recipe: CVap Quiche with Fresh Kale.

retherming brisket

Hassle-Free Sous Vide Style Egg Bite

Are you offering a breakfast buffet for your new year’s patrons? These egg bites are easy to make and hold great in CVap. They are as simple as they are delicious. Read how: Hassle-Free Sous Vide Style Egg Bite.

chicken and waffles

Chicken & Waffles – Damn, It’s Good

So maybe your guests aren’t starting a diet on New Year’s Day. They can go all-out with the classic chicken and waffles. It’s sweet. It’s savory. And damn, it’s good. Read about it here: Chicken & Waffles – Damn, It’s Good.

Essential Kitchen Equipment for New Restaurants: A Checklist

essential kitchen equipment

Opening a new restaurant is no walk in the park. There are lots of hurdles to bear in mind. According to recent data, one in three restaurants won’t survive its first year. To paraphrase Benjamin Franklin, if you fail to plan, you plan to fail. Talk to folks who have walked the walk of opening a thriving operation. Chef Andy Husbands is a great example. He’s successfully opened five locations of his Boston-based concept, The Smoke Shop. His advice is spot on.

“Use professionals. That is a business planner, an architect, a lawyer, and not your cousin. Use somebody who actually writes restaurant leases. Someone who actually designs restaurants. I know that your friend’s sister is really good at designing, but if she hasn’t designed a restaurant before, you don’t want her making mistakes on your dime.”

Obviously, there are a ton of things to consider for a new restaurant. We’re concentrating on the stuff you’ll need inside this new place, essential kitchen equipment. Specifically, equipment for prepping, cooking, storing, and cold storage. Most commercial kitchens are going to need some mix of the following:

  • Cooking Equipment
  • Cold Storage Equipment
  • Ice Maker
  • Food Prep Surfaces and Equipment
  • Storage Racks and Containers
  • Dish Washing Area

Cooking Equipment

Ovens

When you think about essential kitchen equipment, the first thing that pops into your mind is probably ovens. Commercial ovens aren’t like home ovens. They have higher power and larger capacities. And they’re designed to cook all day, every day. There are a bunch of different types of ovens, and they all come in different sizes. Calculate how much food you will prepare during a typical service to figure out what capacity you’ll need. And don’t forget to lean on your kitchen equipment designer for input.

Oven Types

Conventional Ovens are like ovens found in most homes. They use simple radiant heating elements for cooking food.

Combination ovens or combi ovens are part steamer and part convection oven. Combi ovens are versatile and powerful. They cook faster than any other type of commercial oven. But you will pay for all that speed. They can cost an arm and a leg and aren’t cheap to maintain. If you’re going with a combi, you’ll have to have a vent hood and will have to plumb it to a drain.

Some combi ovens offer lots of bells and whistles. Ask yourself whether you need those fancy features. If they’re not beneficial to your operation, why pay for them? Factor in the repair costs when those extra features break down. You’ll want to weigh the costs versus the benefits before investing in a combi.

Cook and Hold Ovens do exactly that. They cook food and then switch to a holding mode until the food’s ready to be served. They aren’t as fast as combi or retherm ovens, but they make up for that with versatility, precision, and higher food yields. CVap Cook and Hold Ovens are ideal for classic “low and slow” cooking. This boost yields, so you can get more servings from every cut or roast. More servings mean better profits. And because you’re not cooking the hell out of it, food retains more of its natural juices.  

Thermalizers are robust ovens used to reheat prepared cold or frozen foods. When it comes to food safety, time and temperature are important. The more time food spends in the temperature danger zone, the faster bacteria can grow. Thermalizers are designed to push food temps through the zone in under two hours. Winston’s CVap® Retherm Oven is a great example. These retherm ovens don’t just reheat, they are also capable of a wide range of cooking processes, from baking to roasting, to sous vide. Winston’s retherm oven can also automatically switch to hold mode at the end of the cook cycle, taking pressure off the crew.

Microwave Ovens use the same technology as microwaves found in most home kitchens. Commercial models are larger and more powerful. They’re commonly used to retherm individual portions of prepared foods. Even restaurants need to nuke stuff sometimes.

Convection ovens use powerful fans to circulate hot air around the food. This cuts down on hot spots and helps food good more evenly. Convection ovens are perfect for baking. They are fast, but they can dry food out if you’re not careful. It might take a little trial and error to dial in satisfactory results.

Sous Vide

Okay, technically, sous vide is a cooking technique. It’s French for “under vacuum.” It usually involves vacuum-sealing the product in food-grade bags and placing it in an immersion circulator. These circulators keep water at a set temperature. The laws of thermodynamics being what they are, food temperature equalizes with the water temperature. It’s a very precise cooking method. Overcooking is dang near eliminated.

sous vide cvap

Commercial immersion circulators are more powerful than home countertop models. Sous vide can be used for most meats and vegetables. It’s perfect for delicate foods, like fish. Adding spices or oils to the bag before sealing can enhance the flavor. Circulators are not fast cookers. You’ll need to plan to accommodate their slow cook time. Even commercial circulators tend to be fairly small, so you’ll need several circulators to achieve higher volume. Most circulators are placed on countertops so space may be an issue. And many localities require sous vide processes to have an approved HACCP plan, which is another expense. Don’t forget to factor in the need for a vacuum sealer and the cost and labor associated with using the bags.

CVap ovens are ideal for sous vide cooking. Their dual heat system can achieve 100 percent humidity, mirroring the effects of food cooked in an immersion circulator. Since CVap cooks with water vapor instead of a water bath, bags are optional. Additionally, CVap ovens can cook large volumes of food in a small footprint, compared to the expansive countertop space required to cook the same volume in circulators.

Ranges

There are two types of restaurant kitchen ranges – gas and electric. Both have their good and bad points.

Gas ranges utilize live flame, which offers better cooking speed and precision than electric burners. However, they can also be harder to clean.

Electric ranges provide more even cooking and easier cleanup than gas. They take longer to heat up. And utility costs are generally higher than the gas ranges.

Grills

Not every commercial kitchen requires a grill (or griddle) so this may or may not be considered essential kitchen equipment. But if your menu includes burgers, steaks, pancakes, etc., you might consider a grill. Good grills come with a flat griddle surface for making pancakes or grilling sandwiches. Like ovens, you have a choice of gas or electric.

Fryers

Commercial fryers use hot oil or shortening to deep fry products like fried chicken, fries, seafood, appetizers, etc. Smaller restaurants may get by with a countertop model. But if you anticipate serving lots of fried foods, you’ll want to consider a larger floor model.

Commercial fryers are available in gas or electric. Gas fryers tend to cook faster. Electric fryers are usually less expensive to operate. There are dozens of configurations, but they come down to two types – open or pressure. Open fryers are great for fries, seafood, and other fried appetizers. On the other hand, if you’re serving fried chicken, consider a pressure fryer. Pressure frying speeds up the cooking process and makes the final product less greasy.


A well-built fryer can last over 20 years (with regular maintenance). Winston’s Collectramatic® fryer line offers both open and pressure models. Winston’s fryers are strictly electric.

As you can imagine, commercial fryers do come with risks. Anything that uses hot oil to cook can be dangerous if misused. Your staff needs to be thoroughly trained on how to operate a fryer safely.

Holding Equipment

Although they aren’t technically cooking equipment, holding equipment allows you to keep hot cooked food at a safe temperature until you serve it. Holding equipment frees up the cooking equipment to allow you to keep on cooking. Some ovens, such as CVap ovens, can function as holding cabinets, offering double duty from the same footprint.

Holding cabinets are commonly available in half or full size. This gives them a capacity difference from four to 14 pans. Like with ovens, the cabinet’s efficiency depends on its technology. The cheapest are dry radiant heat. Humidified cabinets cost more but are much more effective and offer longer hold times. CVap Holding Cabinets offer the longest quality holding times in the industry.

Consider your holding needs when choosing a holding cabinet. If yours is a low-volume operation, you may not need to hold. The higher your traffic, the more likely it is that you will need it. Holding cabinets can be an important crutch to get you around staffing challenges.

Warming drawers are smaller than holding cabinets but serve the same function. They are usually on or under counters. Drawers are great in operations with limited space, like food trucks and concession areas. Because they recover quickly, drawers are a great option where the food must be accessed frequently. They usually hold one to two hotel pans, depending on the configuration. Humidified drawers are more precise than radiant heat. CVap Hold & Serve Drawers, like other CVap products, offer the best quality hold in the industry.

There are lots of other appliances available for keeping food hot. These include countertop food warmer bins, soup warmers, heat lamps, and steam tables. Think about your menu when deciding what holding solution is best for you.

Cold Storage Equipment

Freezers and Refrigerators

Another must have for any restaurant is refrigeration. Without a fridge, you can’t keep perishable food fresh. Likewise, freezers are crucial for inventory management.

Industrial-grade refrigeration units are designed to meet the requirements of foodservice operations. They are available as reach-in or walk-in units. Although walk-in fridges and freezers have more storage space, smaller restaurants may not need a walk-in.

Be familiar with the maintenance requirements of your refrigeration equipment, as it can be expensive to repair. If a faulty unit reaches unsafe temperatures, it can ruin your inventory and put customers’ health at risk.

Blast chillers are designed to cool foods quickly. The Temperature Danger Zone is as important when cooling food as it is when heating it. Simply placing hot food in a refrigerator to cool may not chill it fast enough. Blast chillers can cool large quantities of food quickly. While they aren’t necessary for every kitchen, they’re a great tool.

Ice Maker

You’ll probably need an ice maker if you’re serving any kind of beverage. Beyond icing drinks, they can also be used to fill bins for keeping canned and bottled beverages cool or as ice baths for food in hotel pans. Factors to consider when choosing an ice machine include capacity and cube shape. The ice maker should also be easy to drain and clean so that old ice or contaminants aren’t lingering in the depths of the ice.

Food Prep Equipment

Food Processors

Another essential kitchen equipment is food processors. They are great for slicing, chopping, blending, and pureeing. They’re handy for making dressings, dips, and sauces.

The more horsepower a processor has, the longer it can operate without bogging down or overheating. Likewise, the processor’s rotations per minute (RPM) affect how efficiently the blade cuts. There are a few different food processor types to consider.

Batch bowl processors are the same type most home cooks are familiar with. Staff simply choose their preferred blade, drop the food in, and collect it in the integral bowl.

Continuous-feed food processors are more of a workhorse. As the name indicates, continuous feed processors run continuously, dropping the food into a separate bowl. They are ideal for high-volume kitchens.

Buffalo choppers are among the most powerful and heavy-duty food processors. They have metal parts and sharp rotating blades sturdy enough to process meat. It’s more of a specialty item. Not every kitchen needs one.

Mixers

Most restaurant kitchens will need a commercial mixer. These are designed for frequent use.

Hand mixers are ideal for quickly blending soups and sauces, chopping up ingredients, and emulsifying dressings.

Countertop mixers work well for smaller restaurants that only need occasional mixing.

Floor mixers are ideal for high-volume commercial kitchens. These huge heavy-duty mixers stand on the floor and have the power to mix massive quantities of ingredients quickly.

Slicers

Commercial slicers are used for slicing meats and cheeses. Horsepower always indicates how long the slicer can run without overheating or bogging down. Check out the slicer’s blade kits and make sure the size works for the type of food you’ll be slicing.

Prep Surfaces and Cutting Boards

Prep tables, counters, and cutting surfaces are essential kitchen equipment. The best prep surfaces are stainless steel. Stainless is tough, doesn’t absorb bacteria, and can withstand the harsh cleaning products used in commercial kitchens.

When it comes to cutting boards, your choices are plastic or wood. Plastic boards are easier to sanitize but can develop deep grooves that can hide bacteria. Wooden boards are tougher to clean than plastic ones but don’t develop grooves as easily.

Consider adopting a color-coded system for cutting boards help prevent cross-contamination.

Storage and Containers

Storage Racks and Shelving

An organized storage shelving system streamlines your kitchen. It keeps the most-used kitchen equipment and supplies within arm’s reach. Likewise, store the stuff that’s used less frequently on the top and bottom shelves. The bottom shelf must be at least six inches off the floor to meet health codes.

Mobile storage racks are handy. They’re commonly sized to fit 20 standard sheet pans and are great for storing and transporting food.

Storage Containers

Storage containers, such as plastic bins and hotel pans, make every cook’s job easier. Pair these with good tape and markers to clearly label containers with contents and dates. It will make FIFO easier.

Dishwashing Area

Every restaurant will need a designated dishwashing area. Small operations may be able to get away with a simple triple sink setup (for washing, rinsing, and sanitizing). Larger restaurants will want to consider a commercial dishwasher, which can handle a much larger volume of dishes. As with planning in other areas of the restaurant, contemplate your anticipated need when choosing a dishwashing option. Check local health codes to see what is required for your location.

Although it’s not really part of dishwashing, having the proper number of handwashing sinks available to your staff is equally important. It’s something every health inspector will look for.

Sourcing Restaurant Equipment

It is advisable to reach out to a foodservice consultant, manufacturer’s rep, or equipment dealer to guide you, particularly if you plan to buy all-new equipment.

Buying used equipment is an option. There are caveats to buying used. While used equipment is often still in great shape, you don’t know if it’s been properly maintained or works as it should. Used equipment isn’t usually covered by the manufacturer’s warranty, so you’re fully responsible for repairs.

Begin your search with a little online investigation. Numerous large online equipment dealers can help narrow down your search. Interested in Winston’s products? Fill out our contact form. We’ll be glad to help.

Food Warmers Vs. Rethermalizers: Uses, Types, and Benefits

rethermalizer vs warmer

Having the right tools for the job makes all the difference. In a commercial kitchen, food rethermalizers and food warmers are two important tools. You might think these appliances do the same thing. However, their function is very different. Each has unique benefits.

What is a Rethermalizer?

In general, rethermalizers are appliances designed specifically to reheat prepared foods from a chilled or frozen state of less than 40°F to a temperature of more than 165°F safely and quickly. They don’t require food to be slacked or thawed before retherming. Rethermalizers must be capable of boosting food temperature through the “Danger Zone” (between 40°F and 140°F) in under two hours (not to be confused with Kenny Loggin’s classic Danger Zone). This is critical because bacteria reproduction goes into overdrive within that temperature range, doubling every 20 minutes. Once food passes 140°F those little bacterial bastards are killed off.

Most rethermalizers use water as a heat transfer medium.

rethermalizer vs warmer

Uses for a Rethermalizer

Just as the name implies, rethermalizers reheat food. They are especially useful in operations that prepare and freeze large batches of food ahead of time. Ideal menu items for retherming include soups, casseroles, sauces, pasta, vegetables, bread, desserts, and meats.

We all know that finding good help right now is a royal pain in the butt. With no end in sight to the tight labor market, it’s important to have tools that are easy to use and don’t need a lot of babysitting. Rethermalizers are a great option. They’re push-button simple, and most feature an automatic hold function. Many have programmed cooking functions, so staff can just load them up and push start.

Types of Rethermalizers

There are four basic types of rethermalizers: water bath, induction, combi oven, and CVap® Retherm Ovens. The first two are typically countertop appliances (though some large floor models are found in QSR chains). The latter two are usually floor models.

Bain Marie or water-filled rethermalizers use a water well to reheat food quickly and gently. Although this type can be a more economic option, there are a couple of disadvantages. Water-filled rethermalizers need about 15 minutes to preheat before adding the product. And it’s necessary to check the water level about every two hours. Allowing the water level to drop too low can damage the unit and burn the food.

Some water bath rethermalizers are sous vide immersion circulators. Food is prepped and sealed in vacuum bags. It can be cooked right away, or chilled or frozen for later use. The bagged products are placed directly in the heated water bath. Once it reaches serving temp food can remain in the water bath until serving. The water bath prevents it from overcooking or cooling down.

Induction rethermalizers remain cool until an induction-ready inset is placed inside. They are very efficient since no energy is expended in preheating. Virtually all heat is inducted directly into the food, quickly retherming it. Because induction units don’t utilize water baths, they won’t develop the funky scaling that can develop in water bath appliances.

rethermalizer vs warmer
foodservice products

Combi ovens are popular for rethermalizing. Combis get their name from their combination of hot steam and hot convected air to quickly retherm food. They are hella fast, and hella powerful. But they’re also hella expensive and can be pretty damned complicated to use. Speaking of expensive, you’ll want to factor in the required chemicals and maintenance that combis must have.

Like CVap Retherm Ovens, combis don’t just thermalize. Most are capable of a wide range of other cooking processes.

CVap Retherm Ovens use heated water vapor as their primary heat source. This means you can retherm in a CVap oven with or without vacuum bags. It’s like sous vide, without the mess. CVap ovens can also roast, steam, bake, sous vide, low-temp steam, proof, and more. You can even use them as food warmers. They automatically shift from cooking to holding mode at the conclusion of their cooking cycle.

Rethermalizers vs. Food Warmers

Rethermalizers can be used as food warmers. But food warmers cannot be used as rethermalizers. They perform very different functions. Rethermalizers are designed to quickly heat food to safe temperatures. Although food warmer might sound like it does the same thing, that’s not the case. Food warmers are designed to keep hot cooked food at a safe temperature. They aren’t designed to heat up cold food. If anybody tells you different, they are either pulling your leg or are ignorant to the basic functions of kitchen equipment.

What is a Food Warmer?

Food warmers maintain food temperatures above the minimum safe temperature of 140°F. They are called several different things: warmers, holding cabinets, hot boxes, warming drawers, etc. Food warmers are great for operations that have predictable rush periods, like school cafeterias and fast-food restaurants. They allow cooking to be done ahead of the rush. Food is held hot until serving. This allows more efficient use of the staff on hand. Just like rethermalizers, many warmers rely on heated water in some form to provide continuous heat.

Uses of a Food Warmer

As the name implies, food warmers keep food warm. They are useful in rush traffic situations and in operations that need to serve throughout the day. Food warmers help provide quick service by minimizing prep time.

food warmer

Types of Food Warmers

Food warmers come in all shapes and sizes. Some are simple, such as chafing dishes, heat lamps, warming shelves, and heated strips. The simpler warmers are only good for short-term holding, like on a serving line.

Countertop warmers are next up in the holding hierarchy. They include kettles, bins, and drawers. Kettles are great for soups and sauces. Bins usually hold full or fractional pans, so you can hold different products together (if they share similar settings). Warming drawers are great because they have a closed environment, enabling more precise control of food temperature. Drawers take up relatively little space, making them ideal for food trucks, concessions, and other operations where space is critical.

Finally, the largest food warmers are holding cabinets. These are available in under-counter, half, or full-sized configurations. They let you hold lots of food in a small footprint.

Just as there are different types of food warmers, there are also different technologies behind them.

Warmer Technologies

Dry warmers are just that. These drawers or cabinets, also known as “hot boxes,” use simple electrical heating elements to heat the unit interior. Because they don’t add moisture to the unit’s atmosphere, they can only hold for a short time before food quality starts to drop. Inevitably, food will start to lose its moisture. Not only does this dry the food out, but it also causes food temperature to drop (because evaporation is a cooling process).

Passive humidity warmers add a water bath to the unit’s interior. They are an improvement over dry warmers because the addition of a water bath means moisture isn’t being provided solely by the food itself. They are better than dry units but are less accurate than more sophisticated warmers.

Humidified warmers offer better temperature accuracy. Their internal water bath is temperature-controlled, which extends holding time.

The most accurate warmers are Winston’s CVap (controlled vapor) holding cabinets and warming drawers. CVap uses a dual-heat system of dry air heat and moist vapor heat. This means that CVap warmers precisely control food temperature and maintain the desired surface texture. CVap is equally effective at holding crisp or moist foods for extended times.

Rethermalizer vs. Warmer: Differences

As described previously, the biggest difference between rethermalizers and warmers is their function. Rethermalizers reheat or cook food. Food warmers do not. As mentioned before, you can hold food in a rethermalizer, but you cannot cook in a food warmer. Rethermalizers are designed for speed and require much more electrical power than warmers.

Rethermalizer vs Warmers: Similarities

Rethermalizers and warmers share some similarities. Many use some form of water or water vapor as the thermal medium to cook or hold food. Since water is efficient at heat transfer more energy is directed into the food than is wasted in the atmosphere.

Rethermalizer and warmers may have similar appearances. Although there may be some overlap in function, they serve different primary purposes.

The Best Practices for Oil Filtration

Best Practices for Oil Filtration

Americans love our fried foods. According to some estimates, as much as a third of the U.S. population eats fried food every day. Fried foods are fast, convenient, and dang tasty. What do all fried foods have in common? Oil. And the #1 way to keep that oil working for you is to adopt the best practices for oil filtration.

Oil (or shortening) is the muscle behind frying. A highly effective cooking medium, it quickly transfers thermal energy into food. Frying under pressure boosts that speed even further. The core truth of frying is that your food will only be as good as your oil. You could be frying the most amazing products, but if your oil is crappy, your food will be crappy. You’ve got to show your oil some love.

Best Practices for Oil Filtration

Oil isn’t cheap. It’s one of the most significant operating expenses for some operations. Adopting best practices extends oil life, allowing you to get maximum use out of every drop. Critically, the most effective way to maintain oil is by filtering. Every fryer manufacturer has its own recommended filter procedure. We’re discussing the best practices for Collectramatic® fryers.

Passive and Active Oil Filtration

Filtering takes two forms: passive and active. Both are important.

Passive filtering involves passing the oil through a filter medium to remove particulate matter. Winston’s Shortening Filter is designed specifically for use with Collectramatic Fryers. However, you may use our filter with virtually any commercial fryer. It uses paper filter material to passively filter oil. The filtering process is simple. You can view it here.

Active filtering involves using a chemical powder to polish the oil. It acts like a magnet that attracts and removes food debris and extracts soluble liquid impurities, dissolved flavorants, and odors that spoil fried food. Examples of filter powers are Fryclone and Magnesol. Although active filtering isn’t needed as frequently as passive filtering, it is equally important. Winston recommends polishing the oil at least once each day

fryer accessories
fryer accessories

How Often Should you Filter?

Collectramatic fryers have a unique design that reduces the frequency of filtering. Nonetheless, our fryers need periodic filtering to maintain high quality. How often depends on the fryer size. The six-head fryer needs filtering approximately every 20 rounds (or 360 pounds of chicken). The smaller four-head fryer needs it every 30 rounds. Or put another way, oil should be filtered after 120 heads of chicken have been cooked. And as mentioned before, we recommend polishing the oil at least once daily.

Why Bother Filtering?

It’s all a matter of taste or flavor. Anything that negatively affects the flavor of your oil will have a similar effect on the food in the fryer. Filtering removes cracklings, debris, impurities, and other materials that can spoil oil flavor. Without the best practices for oil filtration, this will happen sooner rather than later.

Oil degradation isn’t limited to cracklings and contaminants. It’s also subject to oxidation and breakdown from excessive heat. The hotter the cooking temperature, the faster oil will break down. You will replace all oil eventually, but regular filtering and polishing will enable you to maximize its lifecycle.

Of course, you always have the option of just dumping your oil and refilling with fresh oil. But then again, you can pile cash behind your building and light it on fire too. The results are the same.

10 Food Safety Tips for Commercial Kitchens

food safety tips

According to the Centers for Disease Control (CDC), nearly twenty percent of foodborne illnesses are caused by poor food safety. In real-world numbers, that’s approximately 3,000 deaths in the U.S. annually. No commercial kitchen operator wants to be the source of an illness outbreak. There are several steps you can take to minimize the risk. Check out these food safety tips to ensure your kitchen stays safe for your customers, your employees, and your bottom line.

Maintaining clean and safe conditions for your food prep areas is critically important. Salmonella and other dangerous bacteria cause serious illness. Knowing how to ace health department inspections ensures you can operate a safe and clean kitchen. Additionally, it gives the operator peace of mind.

Commercial and industrial kitchens can be very hectic, making it challenging to ensure that everything is done properly. But following these ten safety tips will protect the health and safety of your customers and staff.

Washing Hand

The simplest food safety tip is also the most important. Wash your dang hands. This means providing a dedicated hand washing station for your staff in a commercial kitchen. This minimizes cross-contamination. Even trace amounts of bacteria can sicken someone, so hand washing is a priority. Soapy hands should be washed for at least 20 seconds under running water. Make it easy for your team by recommending they sing the Alphabet song or Happy Birthday in their heads while washing their hands.

food safety tips

Stay Home When Sick

This is another no-brainer, but it continues to be an issue. The CDC’s National Center for Environmental Health (NCEH) surveyed nearly 500 food workers. The results showed that five percent of workers admitted to preparing food while they were suffering from vomiting or diarrhea. Doing so puts their customers’ health at risk. Gastrointestinal illnesses, such as Norovirus and E. coli, are incredibly contagious. It takes as few as 18 viral particles to make someone sick. And many contagions can survive the cooking process.

Allowing sick workers to be present in your operation puts all your customers and staff at risk. Offering sick pay to workers indeed carries a cost. But removing the financial pressure for workers to “power through” an illness can protect your business and reputation. And in these days of chronic labor shortage, including a sick pay benefit can be another incentive for folks to join your team.

Use Gloves, But Use Them Right

Workers should be wearing kitchen gloves when preparing food. This food safety tip is a tricky one because they need to understand that they can’t use the same gloves for every ingredient. Gloves must be changed when moving from raw meat and poultry to cooked food. Failure to do so can spread contaminants to the customer’s food, leading to food poisoning. Providing an ample supply of gloves for your workers is important. Training staff on proper glove use is time well spent.

food safety tips

Washing Food Properly

Make sure fruits and vegetables are washed. Even produce that will be peeled or skinned must be washed. Not doing so risks spreading bacteria from the outside of the product to the inside.  Fruits and vegetables should be washed under cold running water. To add an extra layer of safety, use an FDA-approved fruit and vegetable rinse. Check with your health department to see which options are recommended in your area.

food safety tip

It's All About the Temperature

Food temperature is absolutely the most important factor in food safety. Assuring that food transitions quickly through the temperature danger zone (40°F to 140°F) is paramount. Likewise, it’s important to know all proteins’ minimum safe internal temperature. The Food Safety and Inspection Service (FSIS) sets the standards for beef, pork, poultry, and seafood. When reheating cooked food, it is important to reach a minimum of 165°F. Care should also be taken when verifying food temperatures so that thermometers don’t inadvertently cross contaminates.

temperature

If cooked food is to be held hot, it’s equally important to verify that food temperature doesn’t drop into the danger zone.

Winston’s CVap® technology is an industry leader when it comes to safe food temperatures. CVap’s unique dual-heat system is designed to help food transition quickly through the temperature danger zone. Once the desired doneness temperature is achieved, CVap can maintain food at the desired temperature for an extended period without sacrificing food quality. It truly is a game changer.

Implementing and maintaining a HACCP (Hazard Analysis and Critical Control Point) plan is advisable.  This is a plan with a preventative approach to food safety. www.fda.gov

Avoid Cross-Contamination

Naturally, many foodborne illnesses arise from accidental cross-contamination, where bacteria are spread from raw meat or poultry to other foods. Utilize separate cutting boards for raw produce, meat, poultry, seafood, and eggs. Consider labeling each board with its intended purpose or use a color-coded system. Be sure to keep boards separate from one another. Likewise, use separate utensils and meat thermometers.

food safety tips

Stay Cool and Separate

Refrigeration and freezing are the primary methods for storing foods. Raw meat and poultry should be kept separate from other foods, especially vegetables, prepared sauces, and anything else that requires little preparation. The FDA advises that food should be cooled to 41°F or below and cooled in a way that provides ventilation, so air can circulate around the food. Make sure meat doesn’t drip and contaminate other food. Cut vegetables should never be left out at room temperature but properly stored away. Never store food on the floor either, and have a thermometer in the refrigerator, not just the freezer.

As stated before, it’s important for food to quickly transition through the danger zone when cooking. It’s just as important for food to cool quickly, to pass through the zone in as little time as possible. Blast chillers are optimal for this, but not every commercial kitchen has one. It’s advisable to store food in shallow containers rather than large vessels to increase the exposed food surface and allow more heat to dissipate. Another option is to place food containers in an ice bath, which will facilitate the chilling effect.

It’s important to understand the role of cold storage and food safety. Refrigeration does not stop bacteria from reproducing but does slow it down. That’s why keeping track of how long a product has been refrigerated is important. Once it’s outside the safe window, it should be discarded.

food safety tips

Freezing, on the other hand, stops bacterial growth. However, bacteria are still present in frozen food. Once thawed, all relevant safety protocols must still be followed.

Although food temperature requirements vary, it’s a good rule of thumb to consider any food that has been in the danger zone for more than four hours to be unsafe and thrown away.

Clean and Sanitize Prep Surfaces and Equipment

Your staff needs a proper workstation and equipment to do their job. Use hot soapy water or a small amount of commercial bleach or cleaner on cutting boards, dishes, countertops, etc. It’s equally important to keep your equipment clean. Follow the manufacturer’s recommendations when it comes to cleaning and sanitizing ovens, holding cabinets, grills, and other commercial equipment.

As is the case with many food safety factors, it’s advisable to check with your health department for specific recommendations.

clean
clean
clean

Label Food

The mantra with food is FIFO (First In, First Out). Label food with its arrival date and expiration date, and make sure stock is rotated so that the older stock is used first. Be aware of expiration dates and follow them. The golden rule is “if in doubt, throw it out.” Saving a few pennies by using expired products can cost you dearly if it causes an outbreak of foodborne illness.

Staff Training

Your operation is only as good as your staff. That makes it critical to properly train your staff in all aspects of food safety. Failure to train can lead to shortcuts and a lack of awareness, increasing the risk of your customers getting sick. Each new staff member must be properly trained, both in what to do and what not to do.

An excellent source for food safety is FoodSafety.gov. You can keep up with any food safety recalls, cooking tips and other important information.

food safety tips

Is My Kitchen Equipment Required to Be Under a Hood?

steamy kitchen
steamy kitchen

Does your commercial kitchen equipment require a vent hood? It depends on several factors. These include the type of equipment, your menu, and your operation’s location. The ultimate judges of hood requirements are your local health and fire officials. They will advise whether hoods are required and, if so, what type. Always check with local officials before proceeding. Most states and municipalities adhere to the International Mechanical Code. But you may find that your locale has additional guidelines. For example, New York City’s codes are more stringent than most other municipalities.

Commercial kitchen vent hoods are expensive. Depending on the type, they can cost as much as $1000 a foot to install. Add to that the cost of operating and maintenance, and you’ve got a substantial chunk of change. So, in these days of constant inflation, you may be looking to save where you can. Perhaps you’re wondering if your equipment must be under a hood.

Different Hoods for Different Situations

frying in oil

Type 1 Hoods

Appliances that produce greasy by-products and smoke require Type 1 hoods. These hoods primarily deal with the removal of grease particles from the air. For this reason, many refer to them as grease hoods. Type 1 hoods are typically above deep fryers, cooktops, open-flame stoves, conveyor-pizza ovens, char-broilers, and such. Because of the grease by-products that Type 1 hoods capture, they require frequent cleanings to help prevent damage and fire risks due to grease buildup.

Type 2 Hoods

Type 2 Hoods are for other kitchen appliances that don’t have to pertain directly to cooking. These appliances can include dishwashers, pasta cookers, and other equipment that doesn’t produce smoke or grease. Since Type 2 hoods mainly deal with removing heat and steam from the air, the industry refers to them as condensate hoods or heat hoods. They help create a more comfortable work environment.

We strongly advise you to contact a consultant or other knowledgeable foodservice professional to determine whether a vent system is needed (and if so, which type). Adding a ventilation system you hadn’t budgeted for is a financial blow for an operation that already operates on slim margins.

foodservice products

Vent Hoods and Winston Products

Collectramatic® fryers must always be under hoods. Likewise, a Winston Smoker Box with your CVap® oven will require it to be placed under a vent hood or outdoors. That little box generates a lot of smoke.

Although the above Winston products require vent hoods, you can usually use CVap products without hoods. We hired the independent testing firm Intertek to verify CVap’s compliance with the EPA’s Method 202 – Condensable Particulate Matter standards. The ovens were checked for particulate compliance using full loads of pizzas (good and greasy food). The results speak for themselves. CVap ovens breezed through to a passing grade. Place CVap ovens, holding cabinets, and warming drawers where sufficient electrical power is available.

At the risk of sounding repetitive, please don’t just take our word for it. As mentioned, local codes can vary a lot. It’ll save you money and peace of mind to consult with your local authorities (and perhaps a consultant) to ensure you comply with your area’s codes.

CVap® Retherm Oven: Rethermalizing Prepared Foods in Bulk

Rethermalizing Prepared Foods

Retherming bulk packages of prepared foods can be challenging unless you have the right equipment. To clarify, let’s discuss rethermalizing, define prepared foods, and outline what operations are likely to use premade food. Finally, we’ll talk about what equipment is best suited to retherm them.

What is Rethermalizing?

Rethermalization is the process by which prepackaged food that is either frozen or chilled is brought to hot temperatures safely and effectively. Food must transition through the temperature danger zone (41°F to 135°F) in under two hours to meet the FDA Food Code. And although we’re primarily talking about commercially prepared foods, you can also use the retherming processes on leftovers. When reheating leftovers, food must reach 165°F in under two hours (though 90 minutes is preferred). (If you want to get down to the nitty-gritty, find specific requirements in Chapter 3 Section 403.11 – Reheating for Hot Holding – Subsection A – E (page 91) and Chart 4-B.)

Rethermalizing Prepared Foods

What are Prepared Foods?

Prepared foods encompass a wide range of food products. In the broadest sense, prepared food is food that is ready for consumption. It has been produced elsewhere and sold to the consumer (be that an individual or an organization). We’re speaking primarily of commercially prepared foods. These are foods that are mass-produced long before consumption. They come in a can, a chub, vacuum-seal, frozen, or other forms.

Rethermalizing Prepared Foods

Popular with operators, prepared foods decrease labor by outsourcing the initial food product. Portion control is made simple. And when rethermed properly, prepared foods are indistinguishable from made-to-order food.

Who Typically Serves Prepared Foods?

Although commercial foodservice primarily serves prepared foods, they are also popular in these foodservice segments:

B&I (Business and Industry)

Businesses that are not primarily foodservice operators but purchase foodservice items (such as corporate cafeterias).
It also includes government facilities.

Education

This includes preschools, K-12, colleges, and universities.

Healthcare

Another broad category. Includes hospitals, nursing homes, rehab facilities, senior living facilities, and others.

Concessions

Stadiums, museums, conference centers, amusement venues, country clubs, and others.

Catering

Also implemented at event facilities and mobile caterers.

These seem like widely disparate operations, but they have one thing in common.
They all need the ability to retherm large quantities of food quickly and safely.

Retherming Equipment

Achieve retherming by utilizing several different equipment pieces. The most common are rethermalizing ovens (a.k.a., thermalizersthermalizer ovensrethermalizersretherm ovens, and others).

Some folks may think first of combi ovens. Combis certainly can do the job and do it faster than most other oven types. But they also involve a substantial investment in upfront costs and operating costs. They require expensive vent hoods in most locations. A more economical option is the rethermalizing oven.

history why we build retherm ovens

In many respects, retherm ovens are like convection ovens or cook and hold ovens. However, retherm ovens have greater wattage and air movement. CVap Retherm Ovens also feature vapor heat. Consequently, this improves energy transfer efficiency. Retherm efficiency is the transfer of energy from a heated cabinet to a thermal mass (food) at a fast and controlled rate. In other words, retherm energy efficiency measures how much power an oven consumes and delivers to the food product during rethermalization. Since heated vapor is tremendously efficient at energy transfer, CVap retherm ovens excel at heating a thermal mass quickly.

Critically, the larger the thermal mass, the more energy (kW) is needed to transfer to the mass. Similarly, the more energy (kW), the faster the thermal mass can absorb the energy and reach desired temperatures. Consequently, this makes retherm ovens ideal for reheating chilled or frozen foods. They deliver lots of energy quickly.

Winston CVap Retherm Oven

Of course, Winston’s CVap® Retherm Oven is the hands-down best. CVap Retherm Ovens feature two circulation fans, providing robust air circulation throughout the oven. The fans speed up the retherming process and minimize hot or cold zones within the oven.

Winston-Foodservice-No-Vent-Hood

CVap ovens have a maximum air temperature of 350°F and can operate without a vent hood in most locations. Winston has conducted independent testing to verify. Hood availability is an important consideration when choosing an oven.

Another thing to consider when choosing a retherm oven is versatility. CVap Retherm ovens aren’t one-trick ponies. Yes, they’re great at retherming. But they can also bake, roast, sous vide, low-temp steam, and more. Whether serving prepared foods or cooking from scratch, CVap Retherm Ovens are the perfect oven for any large-volume feeder operation.

Staging Lobster Tails for Catering

Lobster Tails

So you’re hosting a big catered event and want to impress your guests? There is nothing more impressive than lobster…if it’s done right.
We set out to show that CVap® ovens can stage lobster tails for catering right.

Staging Lobster Tails Process

Ingredients

  • 4-5 oz Lobster Tails
  • Melted Butter
  • Paprika

Allow the tails to thaw overnight in the refrigerator, per label instructions. Lobster (and all shellfish, for that matter) is unforgiving regarding safe handling. Make sure to only thaw in the refrigerator, and cook promptly once it has thawed.

Preheat the CVap oven.

Staging Lobster Tails for Catering

The product we chose was Greenhead frozen lobster tails.

lobster

Settings

Cooking

  • Cook Time: 1 hour
  • Cook Vapor: 136°F
  • Cook Air: Sous Vide

Holding

  • Hold Time: 2 hours
  • Hold Vapor: 136°F
  • Hold Air: Sous Vide

Prepare the tails by “boxing” them. This simply means to make an incision with scissors along the top spine of the shell. Crack the shell to carefully pull the lobster meat almost all the way out – BUT NOT COMPLETELY. Leave the end tail meat in the shell and lay the meatier portion on top, see image.

Douse raw tails with plenty of melted butter. Evenly sprinkle with a touch of paprika for color.

Staging Lobster Tails Results

To be honest, I LOVE crustaceans! But usually lobster is just meh. It probably has something to do with being hundreds of miles from the nearest coast. (yep, I’m a bit of a fresh seafood snob). Lobster is too expensive for the experience of chewing on rubber bands. Or at least that’s what I thought before cooking them in CVap. 

Lobster Tails
Lobster Tails
Lobster Tails

We reviewed these babies after about an hour into holding. The texture was tender and juicy. The flavor was buttery, briny, and sweet. They would be perfectly fine to serve in this state. But if you wanted to give them a little more texture or snap, you could finish them in a high-temperature convection, broiler, or even with a blow torch. This gives the lobster meat a toothier bite

CVap gives you so much flexibility and peace of mind. It ensures that all your hard work isn’t wasted by overcooking these tails and turning them tough and rubbery! Don’t shy away from utilizing them as a surf-n-turf option on your catering menu! CVap allows you to serve lobster with sous vide precision, but at a scale to feed scores of people.

What to do with all those lobster tail leftovers? Vac-packed and freeze them for later use! Or turn them into that New England favorite – lobster rolls!
That’s what we did.

We prepared two versions of lobster rolls:

OMG!!  So effing good!

Staging Lobster Tails for Catering

Perfect Pastrami in CVap

Ever had really good pastrami? Many folks have only experienced the lunchmeat version. But that stuff doesn’t hold a candle to the real thing. We wanted to put our CVap® Retherm Oven and Winston Smoker Box through the paces to make this savory, smokey meat.

Pastrami’s Past

Food nerd time. Pastrami originated in Romania. The name comes from the Romanian pastramă, a conjugation of the verb a păstra. It means “to preserve food, to keep something for a long duration.” Pastrami likely also has roots throughout the Aegean region. Like so many cured meats, it originated as a way to preserve meats in the absence of refrigeration.

Pastrami came to the United States with Jewish Romanian immigrants in the 1880s. It was originally made with goose breasts but has transitioned to primarily beef. Although originally a staple of ethnic New York delis, it’s now a favorite of folks just about everywhere. The consensus is that pastramă became pastrami because it rhymed with salami.

Give It Time

One thing to remember about Pastrami – it’s a time investment. You’re looking at a week or more to properly brine (or cure) the proteins. It’s not something you’ll make at the spur of the moment. To obtain the best results you have to plan ahead and give it time.

The Brine

Pastrami Brine
Weight (g/kg)
% Formula
Total
9990.7 g
100.000
Water
9 kg
90.084
Brown Sugar
580 g
5.805
Salt
300 g
3.003
Insta Cure #1 (6.25% NaNO2)
60 g
0.601
Coriander, Whole
13 g
0.130
Mustard Seed
10 g
0.100
Black Peppercorns
10 g
0.100
Pink Peppercorns
8 g
0.080
Fennel Seeds, Whole
4.5 g
0.045
Cinnamon Stick, Whole
3 g
0.030
Chili Flakes
1 g
0.010
Clove, Whole
0.7 g
0.007
Bay Leaf
0.5 g
0.005
pastrami

Pastrami Seasoning – Topical

Pastrami Seasoning
Weight (g/kg)
% Formula
Total
304.4 g
100.000
Brown Sugar
75 kg
24.64
Salt
75 g
24.64
Black Pepper, Ground
72 g
2.65
Coriander, Ground
55 g
18.07
Garlic, Granulated
10 g
3.29
Juniper Berry, Ground
10 g
3.29
Chili Flake
7.4 g
2.43

The Proteins

certified angus beef

Beef

most common cuts: brisket, short rib, navel

Carolina style pulled pork

Pork

most common cuts: shoulder, belly, loin, ham, leg (obviously not kosher)

brining perfect turkey

Turkey

most common cut: breast

The Pastrami Process

  1. Prepare the brine by mixing everything together in a large container. Allow plenty of capacity to add the protein (accounting for displacement). This amount of brine can easily cure four full briskets. Adjust the amount accordingly to accommodate larger or smaller quantities.
  2. Trim excess fat from protein.
  3. Add protein to the brine. Allow red meat (beef or pork) to static (or passively) cure in the refrigerator. Brine for at least five days. Seven days is preferred. The maximum cure time for red meat is 14 days. If you are preparing turkey pastrami the cure time can be reduced to between two to five days.
  4. Remove proteins from the brine. Pat dry.
  5. Combine the topical seasoning ingredients. Apply dry rub to brined proteins. Ensure every surface has a light coating of the dry rub.

Cooking Process

We utilized a CVap RTV7-14UV Retherm Oven. The setting will be similar in whatever CVap oven you use. Since it involves smoking, we recommend full-size CVap ovens. Although you can smoke in smaller models, it can overconcentrate the smoke, resulting in a smoky flavor that’s a bit overpowering.

Cook Time: 9 hours OR until the internal temp reaches at least 185°F

Temperature: Vapor: 190°F/Air: 220°F

Place proteins on the open oven racks.

Engaging the Winston Smoker Kit

  1. Plug the timer into the wall and ensure the smoker box is connected to the timer. We like to use a mixed wood pellet as the smoke medium, but sawdust or smaller type chips (no bigger than a fingernail) can be used.
  2. Adjust the timer to start the box heating. Add your smoke medium onto the heating element inside the smoker box. Place the smoker box on a sheet pan inside the oven, on a bottom rack just above the evaporator. The box will take about 15 to 20 minutes to start smoldering.
  3. Press ENTER once the product is placed inside, and the smoker is filled and in place.

We smoked the pastrami for about five hours. The results were outstanding.

pastrami

Chef’s Reflections

We had a few thoughts after completing our pastrami testing:

  • Add a solid sheet pan just above the smoker to catch the drippings. You’ll save yourself a lot of cleanup time.
  • Allow PLENTY of time to make this recipe. If fact, it would be prudent to prepare a month out from serving.
  • Vacuum pack the pastrami once it has cooled. Refrigerate for at least a week before slicing. The longer pastrami sits, the better it gets!
pastrami
pastrami

Serving Ideas

Now that you’ve got all this awesome pastrami, what are you going to do with it? Pastrami is great all by itself, but it’s best enjoyed as part of an ensemble. Here are a few ideas…

Old School

The classic pastrami on rye bread, with a bit of mustard and a pickle on the side. Add a little sauerkraut, cheese, and dressing to make it a reuben.

Deli Burgers

Pump up the decadence by combining a hamburger patty, horseradish sauce, and mustard on rye.

Pastrami Carbonara

Pastrami is good. Pasta is good. Together, they’re great! Lumache pasta, parsley, parmesan cheese – it’s good stuff.

Potato Rösti with Pastrami

Potatoes, crème fraiche, mustard, yum. Damn the carbs, full speed ahead!

Pastrami Hash

Peppers, potatoes, pastrami – it’s a satisfying combination of delicious flavors.

Pastrami Roll Ups

Watching carbs or going keto? Skip the bread and used the pastrami itself to form these tasty treats. Dip in mustard or Russian dressing. Mm mm.